

One Call Systems Manual
One Call Systems Manual
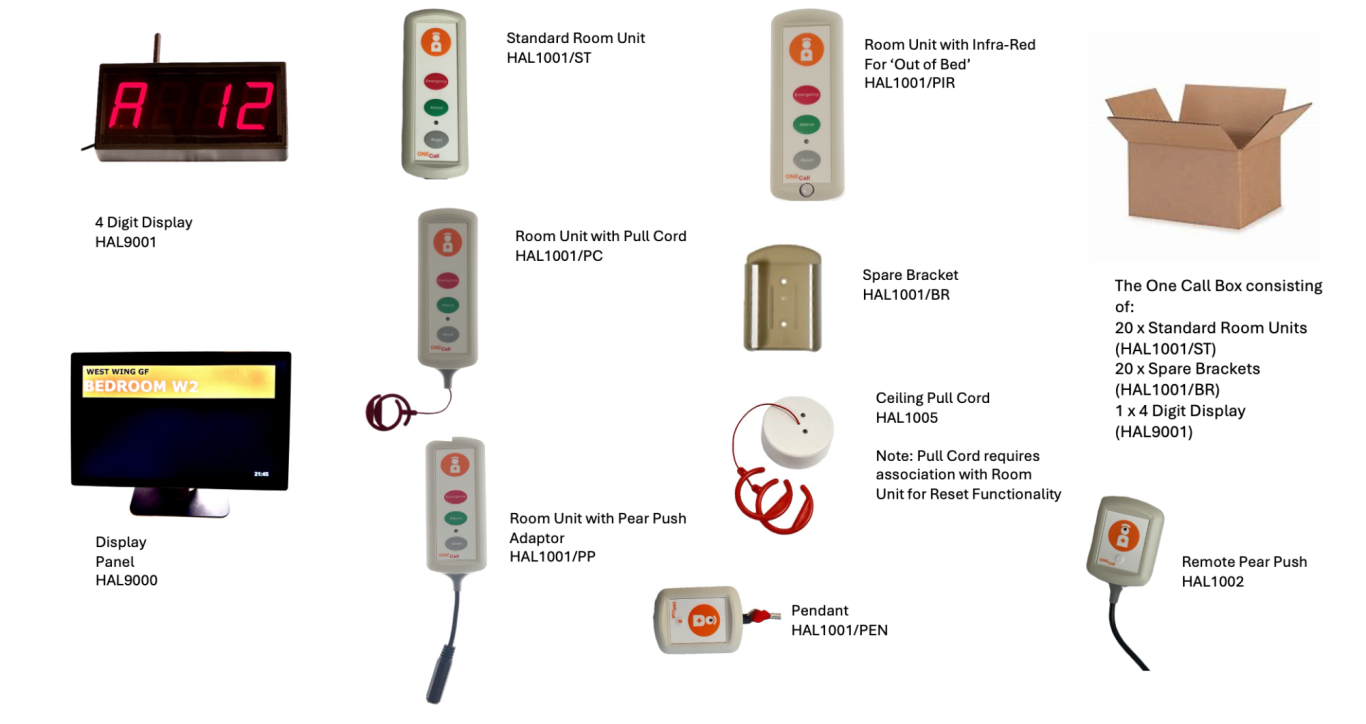
Room Unit
(Pear Push Lead and Pull Cord)
The One Call Room Units are designed to withstand the rigors of your busy care environment.
With three alternative versions - Pear push lead, Pull Cords and blank units, you can choose the unit that best suits your needs. Enclosed in a watertight casing and fitted with a rechargeable battery, you can rest assured that our units can be easily washed and will provide reliable service for up to 2 years on a single charge (Depending on use).
The room unit has been designed in a simple casing to ensure the ease of use for both staff and service users alike.
Once a service user has pressed the large orange Call button on the unit, (or pressed the same button on pear push lead/pulled the red pull cord), the panels will display the specified room with a call, to alert the nurses.
Once the nurse has entered the room they will press the green button if they have nurse attendance, if not they will just press the reset button to clear.
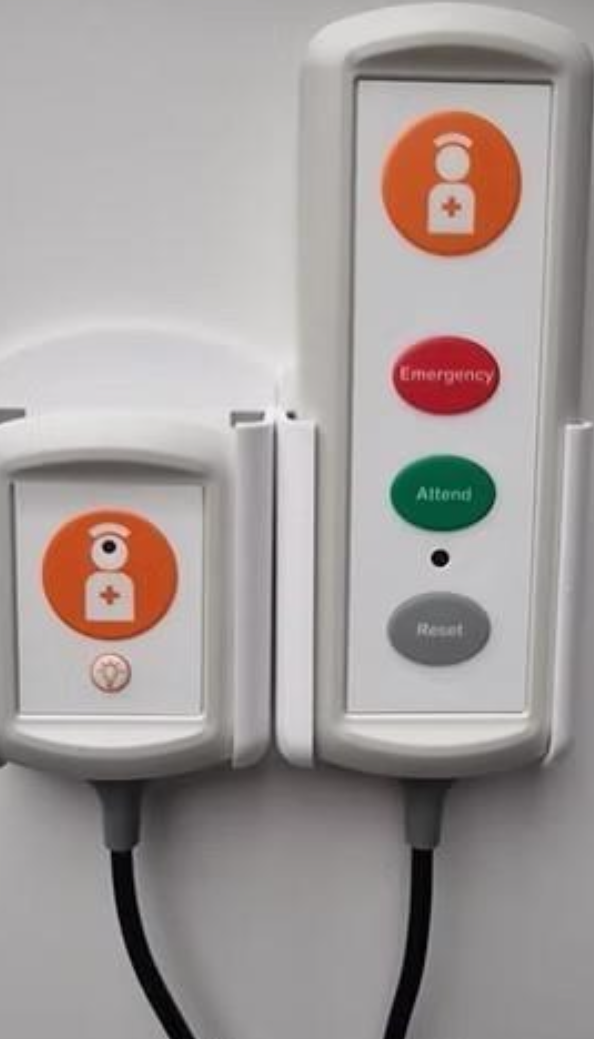
If the nursing staff require assistance they will press the green button which will send an assistance call to the display panels. ( If the units are in attendance mode, just press the call button whilst in attendance).
A second member of staff will then enter the room and reset the room unit. In case of emergencies, press the red emergency button, once the adequate amount of staff are there to deal with the event, press the reset to clear.
The units come with a reassurance light on the room unit, each time a button is pressed the unit will flash red intermittently until it has been reset. You can also easily check the battery level on any room unit, simply press the reset on the unit
whilst it is idle, if the unit flashes green then the battery level is okay. If the unit flashes red then the battery needs recharging.
Simply, remove the back of the unit and plug into a USB C charger, once you have plugged the unit in, the internal LED will be on a permanent red, once the charge is complete this will change to a blue LED, put the back casing back on and return to the room.
Your unit is now charged. The jack socket on the bottom can be used with a pear push lead, or any sort of fall detection as long as it has the right plug, we can make adjustments where required.
Door Contacts
At One Call, we understand that patient safety is
paramount. That's why we offer door contacts as part of
our extensive range of NurseCall products. Our door
contacts instantly notify staff members through the
display panels when a door is opened, ensuring that
patients are always safe.
These can be set as a call, assistance or emergency
depending on what you require.
The coding is the same as the PIRs and Room Units, and
the charging is also the same.
To activate the door contact simply run a magnet that
will be provided at the bottom of the unit, the unit will
flash red, this means its armed.
Once the door is opened it will alert the staff. Simply close the door, reset the unit,
and then re-arm it with magnet.
One Call Systems Manual
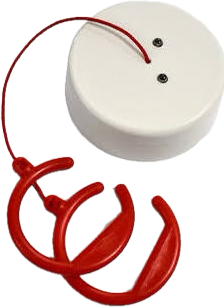
PIR Sensor
At One Call, we prioritize patient safety, which is why we recommend our PIR Sensor for fall detection. This sensor can be built into a room unit or used as a separate device to detect motion and prevent falls in at-risk patients.
With its advanced technology and easy setup, the PIR Sensor is the best and most affordable solution for fall detection on the market.
The product provides a 12 square meter radius of coverage and eliminates any potential tripping hazards with its wire-free design.
With our PIR Sensor, you can expect an efficient and reliable solution for your NurseCall system.
Like the room unit, the PIR sensor also has a rechargeable battery and the battery status and charging sequence are also the same.
Please be aware that the PIR sensor has less battery life than the Room Unit but you should still get around 6 months per charge.
One Call Systems Manual
Recoding the Room Unit, PIR and Door Contacts
The units require two different codes: the House Code and the unit ID.
To code the House Code:
Press and hold reset,
Whilst reset is held down press and release emergency
Whilst reset is still held down press and release attendance
Release reset
(Red LED should be on permanently)
Press attendance once (You’re now in House Code Mode)
Emergencies are 100’s, Attend are 10’s, resets are units.
To code the house code for example
Press Attendance five times
Press Reset once
Press the big call button to store.
To code the unit ID:
Press and hold reset,
Whilst reset is held down press and release emergency
Whilst reset is still held down press and release attendance
Release reset
(Red LED should be on permanently)
Press reset once
Emergencies are 100’s, Attend are 10’s, resets are units
To code to unit ID 123
Press Emergency once
Press Attendance twice
Press Reset three times
Press Call to store, your unit would now be coded to HC 51 unit 123.
Please note if you just need to change the room number just use the unit ID not the House code.
Always listen out for beeps, if the unit for some reason double beeps, the count this as two presses.
One Call Systems Manual
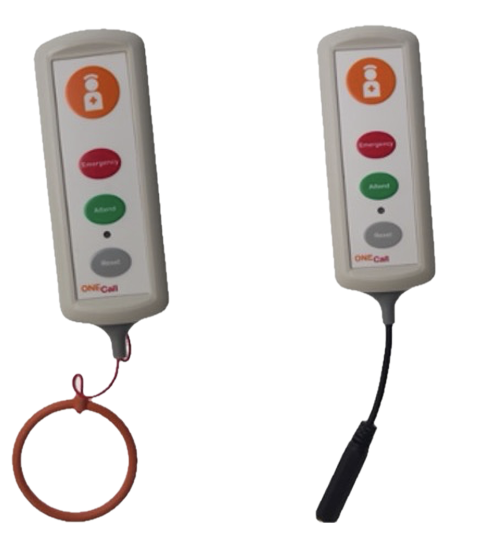
Pendants and Coding
The One Call Pendant is a standard remote pendant on an anti-ligature lanyard.
These can be coded to different call types depending on the customer preference.
All the service user has to do is press the big orange call button, the staff member will then answer the call and reset using the smaller reset button.
To Code the Pendant:
Press and hold reset
Press call twice
Release reset
Press call once
Red light should now be on
To input HC 51
Press call once for 0 hundreds
Press reset 5 times
Press call
Press reset once
Press call
To input unit ID 123
Press reset once
Press call to store
Press reset twice
Press call to store
Press reset three times
Press call to store
This will now be coded to
HC 51 united ID 123 (please
use this as a guide and
adjust to your needs).
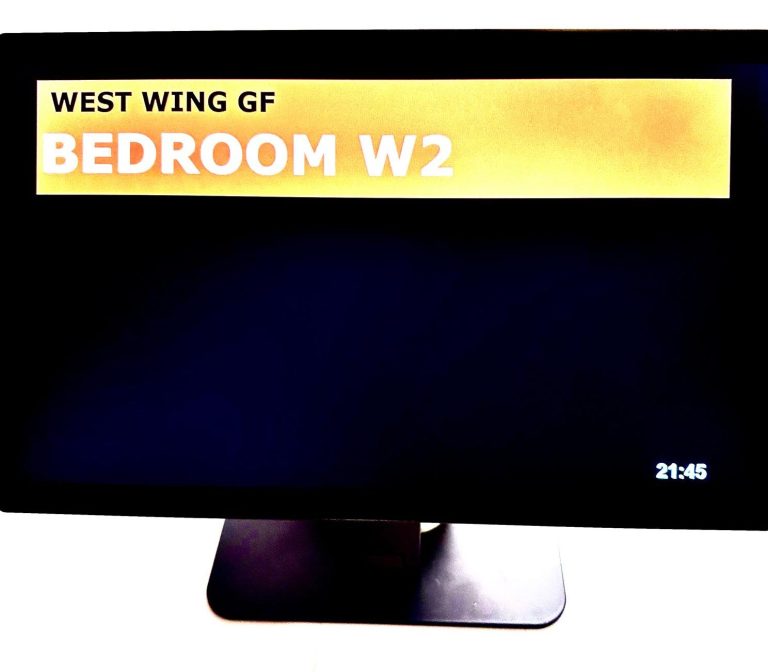
Display Panels
Display panels may vary depending on which panel you have ordered. The display panel requires a 13-amp
socket, preferably unswitched and is only to be touched by management or trusted NurseCall engineers.
The panels have a standard HTM sounds but this can be altered upon request.
All panels will then sound whenever a call from a unit is made. They will also have a time on there to indicate to
staff how long a call has been active.
Calls have an order of priority on the displays, the lowest priority calls are the green attendances, then the next
priority is the orange call.
Blue assistance is next priority and the highest priority is the red emergency.
If there are multiple calls on your screen, the call that has been calling the longest will be the highest priority,
unless another call changes that to a higher priority.
Battery back-up does not come as standard, however is very easily put
onto the displays and it can have an hour and a half capacity, if you have a power cut.

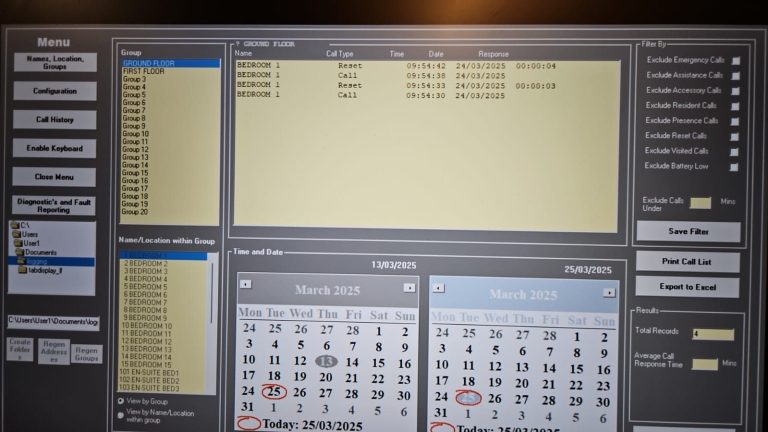
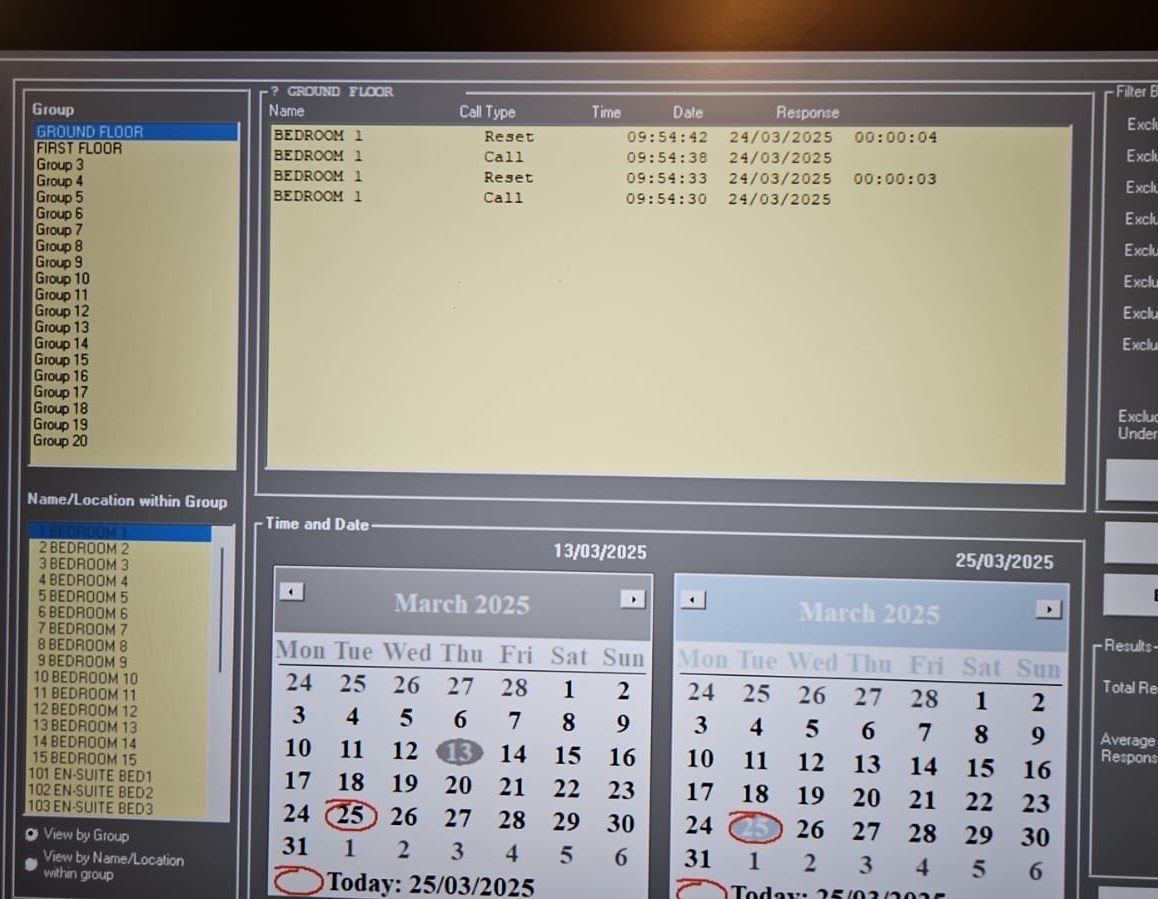
On your next screen click on the call
logging tab and you will see a screen
that will look like the picture to the right.
To get the report you would like, choose
the zone which you need, and then
choose what call types you would like to
see. (If you want to see all call types just
ensure that they are all ticked). Then choose the date
range that you require and your report will
automatically show on the top of your screen.
You can either then export it to excel by inserting a USB
drive into your display and pressing export to excel, or
you can print straight to a printer if you have one
connected your display.
Once you have finished click on the close menu option
and your screen will return to normal.
One Call Systems Manual
Call Logging
To access the call logging press on the
clock on the bottom right of your screen that looks like the picture to the left. Input the code given to you by the engineer who installed your system.
Panel Setup
Your NurseCall system panel will be set up upon installation and there should be no need to adjust these settings.
However, if you do need to make changes to access the different settings, again press on the clock on the bottom right-hand side of your panel and input your code.
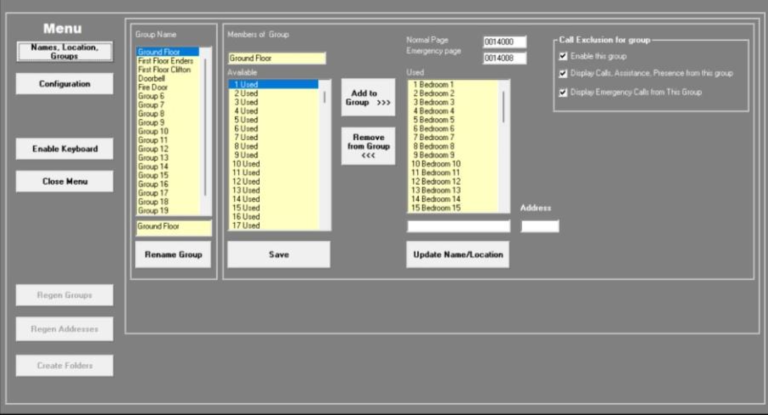
Names, Locations, Groups.
Here you can change your
locations or add more if required.
You can also then add, or edit
bedrooms that you require.
If you need to add a bedroom
door to the ground floor room 7,
choose the zone you require on
the left-hand box, on the central
box scroll down to the number you
require, in this instance we are
going to use number 407.
Then highlight 407 and click the
add to group.
On the right-hand box, scroll down
to the number you have added,
then in the box you can type
in (Above the button update
name/location) type in room door
7 and click the update
name/location.
One Call Systems Manual
Configuration
On the configuration tab, you can
change what your display says on
your idle screen, for example you can
change it to your required name and
press save configuration.
Your panel will reset the app and then
your changes will be evident.
Here you can also find
important information like your
House code. Please never touch this unless
instructed by a NurseCall engineer!!
The later version of software will also have sound control on this page. Simply adjust the sound here and again press
save configuration once the desired sound has been achieved. More updates will occur, and updates to this user
guide will be sent when the updates go live. Once you have finished your changes, click close menu and your
screen will be back to your idle screen.
©Copyright. All rights reserved.
We need your consent to load the translations
We use a third-party service to translate the website content that may collect data about your activity. Please review the details in the privacy policy and accept the service to view the translations.